Let’s Party (Moana style)!

photo-4917949921099776
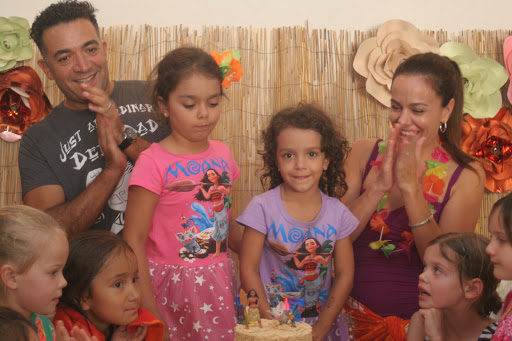
As a mom of 2 girls whose birthdays are within 5 days of each other I am fully committed to throwing only 1 birthday party for the both of them. We’ll see how long they let me get away with that! Last birthday theme was unanimous: Moana! Thankfully, it’s pretty easy to locate and create ‘luau’ styled decorations so it was really up to me how far I was willing to take it…which was pretty far! I don’t know who gets more excited about putting together a party, them or me!

I ended up watching countless hours of YouTube videos on building your own balloon towers and decorating cakes with fondant, and I’m pretty proud of the final results! I was able to keep costs down by using our condo’s party room, buying balloons online in bulk, shopping at the dollar store, baking my own cake and by making almost everything myself. I’m pretty proud of how everything turned out! That cake was quite a feat and if I hadn’t had the assistance of a dear friend who actually used to train pastry chefs I’m not sure how it would have turned out. (Thanks Christina for the fondant expertise!)

This slideshow requires JavaScript.

Check out my Pinterest board and see where I got my inspiration! Moana Pool Party

The “Kakamora Cake Pops” were quite a hit! I made the cake pops by using a box cake mix and coconut oil in place of veg oil.  Once the cake baked and was crumbled, I added shredded coconut to it with the frosting. This is the inside of the cake pop. For the chocolate coating I used Wilton candy melts, and added a little coconut oil to thin it out (I find the candy melts always need a little something to make it thin enough to coat the cake pop without making it too heavy). Then I stuck on some Kakamora faces with frosting. These were a special order from Etsy (from here)- edible ink printed on wafer-like sheets of frosting!

The girls had a lot of fun creating the Moana boats with me. We made a huge batch of blue Jello. While it set in the fridge, the girls made the sails by cutting out triangles and drawing on the spiral and lacing the paper onto toothpicks. We used chocolate wafer cookies for the boats.

That cake!!! I used this recipe for the cake and I’ll never use another recipe again for a cake like this. It was sturdy enough for the layering and fondant yet remained moist and delicious!  The grass skirt was green fondant and the top layer was covered in a cake-crumb coat which looked like sand (the cake crumbs I used were the browned outside bits of the cake which I had removed).

Another favorite creation was the use of pineapples as center pieces. After coring the fruit (which was used in the fruit platter) I simply put a small mason or jam jar inside filled with water. Just as the party began I placed a variety of colorful flowers in each. The fruit vases last several days and are lovely so let my friends take them home after the party wrapped! This is something I’m sure to do again and again as pineapples are quite easy and inexpensive here in Miami.

The character cut-outs are something I highly recommend everyone try doing – as they can be very expensive to buy. I downloaded images from the internet and sent them to print at my local Kinkos for about $1 each. I simply cut them out and glued them to foam core board which I picked up at the dollar store. Out of leftover pieces of foam core I built the support for the cutout to stand up and just hot-glued everything in place. I did these about a week before the party – super cheap and super easy!

The paper flowers are gorgeous hand-made creations a friend of mine had made for a baby shower. I was lucky enough that she let me borrow them for my party and they worked out great with the theme.

This slideshow requires JavaScript.

Back-to-school jitters

imageAre you preparing for the first day of school this week or next? Both of my girls are truly excited to get back to school, see their friends, and dive into new adventures. But, it wasn’t always this easy, I do remember that very first day of preschool. There was a bit of anxiety and insecurity mixed with a twinge of fear of the unknown that kept my littlest one glued to my hip on those first days. If you can relate to this experience then I would love to recommend a book to you.  Bonus: it’s bilingual!

imageLion Heart Goes to School / Corazón de león va a la escuela is a lovely children’s book by Caro Mejía. I heard about the book through a friend of mine and instantly fell in love with the concept. I brought it home to read with my girls, and from the moment we opened the book we could see how unique it really is. For starters, its interactive and customizable. You take photos of yourself and your child making different facial expressions and then glue them where indicated on each page. The story is about a child going to school for the first time.  It walks us through her morning routine and, just before leaving for school, the caregiver reminds her that she has a brave heart and gives her a small wooden-shaped heart to keep in her pocket. This token comes in handy later on at school when she’s feeling lonely, sad or nervous and needs to feel brave again. My favorite part is that a wooden heart comes with the book so your child not only gets to star in the story, but gets her own heart as well!

Lucky for me, my friend was able to introduce me to the author. It turns out we have quite a few things in common! She is from Mexico City (like my husband), has 2 young children (like me) and is raising them to be bicultural and bilingual (like me). I was not surprised to learn that this project was, and continues to be, a labor of love for Caro. She came up with the idea when her first son was nervous about his first day of school. She found a small stone heart in a drawer and gave it to him to keep in his pocket. She told him it was infused with bravery and any time he needed a reinforcement of courage he could hold on to it. When he later recounted how great his day at school had been, thanks to his heart token, she knew she was onto something.  Caro said she thinks it’s very important for children to see themselves reflected in the narrative of the story. And, what better way to accomplish this than to create a book where your child’s face is actually on each page? Throughout the story there are blank spaces for you to fill in your child’s name as well (although I do wish the spaces were truly blank to make it easier to fill in).  Her hope is that each family will take the the time to customize the book together and also infuse their own family values into the wooden heart whether it be with bravery, compassion, empathy, or courage, for example.  At it’s core, this book is about helping families navigate the transition to daycare or school so that the result is a positive experience.

image
Bianca thoughtfully decorating her heart!

Personally, I have a traumatic memory of getting dropped off for my first day at a new school, in a new country, and feeling horrified! 30 years later and I can remember that day vividly. I would never wish my kids to have a similar experience, and that’s why I think this book is such a wonderful tool! And, if you have a tough time finding kids books in Spanish like I do, then you will love that this one was actually written in Spanish first. If you do pick up a copy of the book I thought you would like to know that Caro plans to donate 50% of all the profits to help children in need. (Also, I am in no way affiliated with sales of the book!)

Good luck with your back-to-school transition! Please let me know in the comments how it goes!

“Tie”-dyed Eggs

IMG_2756

I’m not sure if you saw this video circulating Facebook a couple of weeks ago, but when I did I knew I had to try it. I don’t normally take the leap from ‘like’ to ‘do’ when I see these videos (the majority of which are cooking videos that in 30 seconds and with just a few ingredients, result in an ooey-gooey, calorie-laden, fully-baked dessert) but this video was different.  I actually had all the materials close at hand and it looked simple enough to do with my girls. (*Links to videos below)

About a month ago I did a closet clean-out and came across some really old ties.  Honestly, I can’t believe my husband has hung onto these for over 25 years! I do understand some things have sentimental value, but these ties?? They were just ugly and hadn’t seen the light of day for decades!  So, why not recycle them and create something beautiful? No old ties in your closet? No problem! Really any piece of 100% silk fabric will work, so an old scarf would work too. Also, I’m sure you could find some really inexpensive ties or scarves at a thrift store.  Just be sure to read the labels because only silk fabric will work.

IMG_2713

You’ll need white eggs, squares of 100% silk fabric, string or twine or twisty-ties, white cotton fabric from old t-shirts or muslin, vinegar, water, and a stainless steel or enamel coated pot.

Getting crafty: Tissue Paper Flowers

Spring paper flower

Spring has sprung and seeing colorful flowers in bloom make me so happy!  I happened to have plenty of tissue paper and pipe cleaners on hand, so why not make our very own bright, colorful flowers?

It’s really quite easy and there are steps that my daughter’s nimble little fingers can do as well.  These flowers can be used as decorations for anything from a birthday party to a backyard BBQ.  The pipe cleaners make it easy to attach them almost anywhere.  I wanted to make my plain white flowers a little more cheerful for our Spring celebration so we sprayed them with a light mist of liquid watercolors. (I ordered mine here. Easy to wash off and clean up!!)  If you don’t have liquid watercolor I’m sure a bit of water with a few drops of food coloring would work as well.  Just be sure to use a spray bottle with a fine mist so that you don’t wet the delicate paper too much!   If you do have colorful tissue paper, then have fun with layering different colors colors together.  Each flower will be beautifully unique!

Step 1: Gather your supplies – 6 sheets of tissue paper per flower (cut your rectangular sheets into squares), pipe cleaners (I used green so that we could have green stems), safety scissors

Step 2: Stack the 6 sheets of tissue paper neatly and fold one side over about 1″.  Turn the stack over and fold back the same width.  Continue until it’s all folded up like a fan

Happy Birthday Baby Girl(x2)!

I’m faced with yet another challenge! My girls were born 5 days apart (and 2 years of course!). Come birthday time – what do we do? 1 party for both? Well, that was my intention this year since the baby was turning 1 and, let’s be honest, she won’t know the difference! But then my sanity flew out the window and I planned a cookout at the last minute to celebrate Bianca’s big day. Nothing fancy, but lots of work nonetheless! Then it was Gia’s turn and since her birthday fell on a school day I obligated myself to taking cupcakes in the afternoon so we could all sing her “Happy Birthday” together! And finally the “kiddie party” was on the weekend. Dora has been playing a big part in her life lately so I stuck with that theme.

I sure wish I had been smart enough to come up with the concept for Party City! Whoever did must be a gazillionaire!!! I’m such a sucker for putting together a nice-looking party, though. Thank goodness I love arts and crafts and I always try to have a few (if not most) of the decorations homemade.

Mapa.jpg
Mapa

Here is my version of Dora’s friend Map! I got the idea from one of my favorite websites: Pinterest! I used low-fat cheese sticks and a Sharpie to draw the face on. It only took about 5 minutes to do 24 of them.

Nido! Neat-o!

Lately my little Gia has been fascinated by birds. She loves pointing them out every time she sees one and, if she can, she’ll chase them too! A couple of days ago when a couple of pigeons flew away I explained to her that they’ve gone home to their nido. “La casa de los pájaros se llama nido,” I told her. The next day we see some birds flying away and she says, “Mira mami, los pájaros van a su nido!” (Look mami, the birds are going to their home!) What a memory this one has – maybe that’s normal for a 2 yr old, but nevertheless it makes me so happy since my memory seems to get worse every day!

Of course when I saw this crafty little snack I knew Gia would love it! This will be our little project when she gets home from pre-school today. We’ll post pictures later.

coat pretzels in melted white chocolate and top with a few colorful candies
Coat pretzels in melted white chocolate and top with a few colorful candies.

I got the inspiration from a great blog youaremyfave.com

20130416-223208.jpg
Here are the little nidos Gia and I made today!